COOL ORIGAMI CANDLE HOLDER
I am happy that my SIMPLE ORIGAMI BOXgot so much attention. Thank you for sharing and pinning it! Today we'll be making a slightly more complex box. But fear not - I will guide you through the process with step-by-step photos. As a payoff you will end up with a cool looking box that can also double as a decorative item or even as a holder for tea candles.


- Begin with a square piece of paper. If you do not have a square paper you can easily make one out of a rectangle, just follow these or theseinstructions
- Make a Waterbomb base, following instructions from theSIMPLE ORIGAMI BOX

- Fold left and right flaps up. Turn the model over and repeat on the other side. You will get a lozenge-shaped model

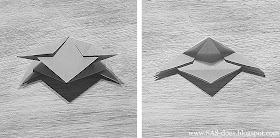
- Next step is a little bit tricky: slightly open the flap and fold so that the top corner meets the bottom corner of the lozenge shape (left image shows this step in process)
- Turn the model over and repeat with both corners on the other side. Your shape should look like the one on the right

- Rotate the model and fold the square part as shown. Make sure to lightly bend the bottom part of the square.

- You should now be able to open up the square shape and refold it into a diamond. Repeat on the right, then turn the model over and repeat on the other side

- Fold each diamond shape in two
- Using existing fold lines as guides fold the top part of the model. Lightly fold the bottom part, as shown on the image, turn the model over and repeat on the other side

- All you have left to do is open the model up. Straighten all folds and enjoy your new cool candle holder

No comments:
Post a Comment