Sunday 28 July 2013

Rose hair ties

Supplies needed to make your own DIY rose hair ties:

Line up six colored pipe cleaners and place the hair tie in the center.

DIY Pipe Cleaner Rose Hair Ties - Crafts Unleashed

Twist the piper cleaners around the elastic band twice.

pipe-cleaner-hair-bands-3

Take the end of each pipe cleaner and bend slightly.

pipe-cleaner-hair-bands-4

Continue to bend and roll each of the 6 (now 12) pipe cleaner strands until they meet in the center.

pipe-cleaner-hair-bands-5pipe-cleaner-hair-bands-6

You will end up with something like the image below.

pipe-cleaner-hair-bands-7

Now, you will want to shape your rose. I usually start with two rolled petals and put them in the center, then I work outwards, overlapping the petals.

pipe-cleaner-hair-bands-8

Attach the  green pipe cleaner to the bottom of the rose.  Twist twice to secure.

pipe-cleaner-hair-bands-9

Bend the end of the green pipe cleaner over about 1.5 cm.  Roll the pipe cleaner and pinch the end to create a leaf shape.

pipe-cleaner-hair-bands-10

And there you have it. Easy pipe cleaner rose hair ties!

DIY Pipe Cleaner Rose Hair Ties 3- Crafts Unleashed


Cardboard typewriter

Here is an idea to make a cardboard typewriter.


Saturday 20 July 2013

Cool origami candle holder

COOL ORIGAMI CANDLE HOLDER

I am happy that my SIMPLE ORIGAMI BOXgot so much attention. Thank you for sharing and pinning it! Today we'll be making a slightly more complex box. But fear not - I will guide you through the process with step-by-step photos. As a payoff you will end up with a cool looking box that can also double as a decorative item or even as a holder for tea candles.

  • Begin with a square piece of paper.  If you do not have a square paper you can easily make one out of a rectangle, just follow these or theseinstructions
  • Make a Waterbomb base, following instructions from theSIMPLE ORIGAMI BOX

  • Fold left and right flaps up.  Turn the model over and repeat on the other side.  You will get a lozenge-shaped model

  • Next step is a little bit tricky: slightly open the flap and fold so that the top corner meets the bottom corner of the lozenge shape (left image shows this step in process)
  • Turn the model over and repeat with both corners on the other side.  Your shape should look like the one on the right
  • Rotate the model and fold the square part as shown.  Make sure to lightly bend the bottom part of the square.
  • You should now be able to open up the square shape and refold it into a diamond.  Repeat on the right, then turn the model over and repeat on the other side
  • Fold each diamond shape  in two
  • Using existing fold lines as guides fold the top part of the model.  Lightly fold the bottom part, as shown on the image, turn the model over and repeat on the other side


  • All you have left to do is open the model up.  Straighten all folds and enjoy your new cool candle holder

Wednesday 17 July 2013

Popsicle arrow and bow

Popsicle stick crafts don't have to be boring. These creative popsicle stick craft ideas are fun to make and functional too!
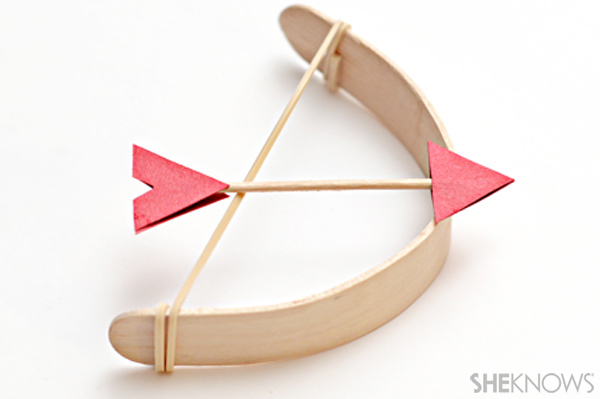
Popsicle stick bow and arrow

Popsicle stick bow and arrow

Your kids will love taking aim with this cool bow and arrow.

What you'll need:

  • wide popsicle stick
  • a pot
  • a drinking glass
  • rubber band
  • scissors
  • glue
  • toothpicks
  • card stock

What you'll do:

  1. Bring a pot of water to a boil on the stove. Put the popsicle stick in the water and boil it for 30 minutes.
  2. Carefully remove the popsicle stick from the water and set it aside until it is cool enough to handle.
  3. Once the popsicle stick has cooled off, gently bend the stick into an arch, then place the bent stick inside a drinking glass so that it will hold its shape while it dries.
  4. Let the stick dry overnight, then remove it from the glass.
  5. Cut a rubber band in half and glue the ends of the rubber band to the inside ends of the popsicle stick.
  6. Once the glue is dry, wrap the rubber band around the ends of the stick until there is no more slack in the band.
  7. Make arrows by cutting two small triangles out of the card stock. Glue a toothpick between the two triangles.
  8. Cut two chevron shapes out of the card stock and glue them to the opposite end of the toothpick.
  9. Once the glue is dry, your arrows are ready to launch!

Paper minions


Wednesday 10 July 2013

Travel Journal

DIY Travel Journal

July 9, 2013

DIY Travel Journal | gimmesomestyleblog.com #travel #journal #diy #write

This post for DIY Travel Journal contains affiliate links.

Remember my DIY Corkboard Map from a couple weeks ago? Along with the map, I also gave Tanner a DIY travel journal so we could document each trip we took together. Anyone that knows me knows that I can’t remember where I last placed my phone, much less everywhere we have traveled and their respective dates. I decided I better remedy that quickly, because even though Tanner’s memory may be a little better than mine, I doubt we will either remember what month or even year “that summer we went to Boston” was for goodness sakes!

DIY Travel Journal | gimmesomestyleblog.com #travel #journal #diy #write

What you’ll need to make a DIY travel Journal:

DIY Travel Journal | gimmesomestyleblog.com #travel #journal #diy #write

 What you’ll do:

  • Stamp the cover of your journal however you choose. I just used the word “travels” Keepin’ it simple!
  • My journal had a cover page that I stamped as well with “Let’s go everywhere!”

DIY Travel Journal | gimmesomestyleblog.com #travel #journal #diy #write

  • I then stamped “Place and Date” and then hand wrote each place we have traveled. 

DIY Travel Journal | gimmesomestyleblog.com #travel #journal #diy #writeDIY Travel Journal | gimmesomestyleblog.com #travel #journal #diy #write

We have really enjoyed being able to look back at our journal and see where each year has taken us. It definitely has been helpful keeping track of everywhere we have been. I’m sure it will be so much fun to look back when the pages are full. Hopefully this will inspire you to make your own journal! Or at the very least just write your travels down somewhere!

DIY Travel Journal | gimmesomestyleblog.com #travel #journal #diy #write

Magical forest art

Revisiting My Magical Forest

When I was little, I used to imagine myself living inside a magical forest. And being an inhabitant of a haunted house for over ten years, I think this magical forest was somewhat different from the kind that most children would imagine. I remember drawing some strange looking animals (like bears with wings or birds with human legs) and my nanny would try to correct me, saying that they looked nothing like the real things. :)

Having this magical forest well kept inside my head until today, I was stunned when I first saw the works of Kathleen Lolley just a few years ago. Her curious looking art describes my "magical forest" as closest as to how I imagined it as a child. It was like reliving my childhood past one long day after another...


Other than her brilliant paintings, she also creates enchanting, intricately made shadow box art...


Fruits Party Hat

Today’s DIY project is sponsored by Garnish – Packaging Life’s Moments.

So I told you all about my pineapple obsession, yes? Well let’s extend that obsession to strawberries and say I warned ya! Today marks the first of a few summery, fruity DIYs I have coming at ya… and what better a way to kick it off then with itty bitty party hats!! I have been eying these paper cone cupsfrom my fave packaging supply company, Garnish, for over a year now because to me, of course, they just screamed “MINI PARTY HATS!” Alas, the stars aligned when Garnish wanted to team up for a post and I got my wish.. itty bitty fruit-inspired party hats!

DIY Fruit-Inspired Party Hats

DIY Fruit-Inspired Mini Party Hats

I like to call these “picnic ready” party hats. They are so perfect for cute little picnics in the park (Yes, you should always wear party hats for picnics), and for fruit-themed birthdays. (Remember all these ideas!?) Bella totally agrees.

Summer Picnic Party Hats

Outside of being totally adorable, the cones are budget friendly and since they are already hat-shaped, it eliminates one pesky step in the party hat making process! Oh you know how I love a win-win. Plus, you can use any leftovers as an excuse to make snow cones… Win. Win. Win.

Garnish Paper Cone Cups

DIY Mini Party Hats

Craft Paint in Red, Yellow and Black
Paintbrushes
Green Crepe Paper (I used doublette crepe paper I had leftover from these roses, but regular crepe paper works just fine too!)
Scissors
Tape
Elastic or Ribbon
Awl (Optional)

First things first, snip the top of your paper cone off, creating an opening for the leaves. Then paint your cones the color of your choice and let dry. Be sure to paint the rim of the cone, too!

Mini Painted Party Hats DIY Berry Party Hats

To make the strawberry, use a tiny paint brush and black paint and paint upside down raindrop shops randomly all over the cone. For the pineapple, use the tiny brush and black paint to paint a few dots on the cone. Then over each dot make a rough triangle shape to mimic the texture of the fruit. Work you way around the cone and up as you go. The triangle shapes should get smaller as you move upward.

DIY Fruit Party Hat Pineapple Party Hat DIY

While these dry, make your leaves! For the strawberry’s leaves, you’ll need a piece of green crepe paper that’s about 8.5″ by 4″. For the pineapple leaves, start with a piece of crepe that is about 8.5″ by 5″.

Fruit Party Hats Mini Fruit Party Hat DIY

Fold up your crepe paper so you have a 1/2″ wide section. Cut one end into a point to form the leaf shape, starting about 3/4 of the way down the paper.

Mini Party Hat DIY Mini Party Hat DIY Tutorial

Unfold and then roll up your section as tightly as possible. Secure the bottom with a small piece of tape.  Carefully pull each leaf out from the center.

Party Hat DIYs Summer Party Hat DIY

For the strawberry leaves, you’ll want to pull the outer leaves out as far as you can so they are almost “horizontal.” For the pineapple leaves, just pull each leaf out slightly so they are more upright. Slide the base of the leaves into the top of the hat. Depending on how snug they fit, you can opt to add a piece of tape inside the hat to secure them, or they may just stay put on their own!

Fruit Inspired Mini Party Hats DIY

To finish your hats, you’ll need to add elastic or ribbon for wearing them! Either tape a piece of ribbon onto each side of the hat or poke a hole in each side with an awl, slip a piece of elastic or ribbon through and secure with a knot.

Summer Fruit Party Hats Petite Party Hats

Pop them in your picnic basket and go have yourself a little picnic party! These hats are the perfect for little kiddos because they are so sweet and petite!

Mini Fruit-Inspired Party Hats DIY